

Adapted from Squirrly’s Expectation Marketing course. Updated November 10, 2026.
This lesson turns your Expectation Marketing audit into an actionable plan. Start with the gaps that prevent people from understanding your business, evaluating your offer, or contacting you. Then build a sustainable workflow for content, social media, mobile usability, and email.
In this article, we’ll focus on your options for how to get started. We’ll also go through each element of the audit and tell you which actions you should be taking.
I Want Expectation Marketing, and I Want It Now
If you agree with the above-mentioned statement that’s awesome! We’re here to help.
Depending on how fast you want to see results with your marketing, you can choose a different path. You have 3 options in starting with this strategy:
- DIY. We’ll offer you some guidelines in these lessons and how you can get started with this strategy. And from there on you will apply it as you see fit. But you’ll need help with creating the whole content, targeting it right, promoting it, and applying it on your own. Of course, this is the longest route but probably the most adventurous.
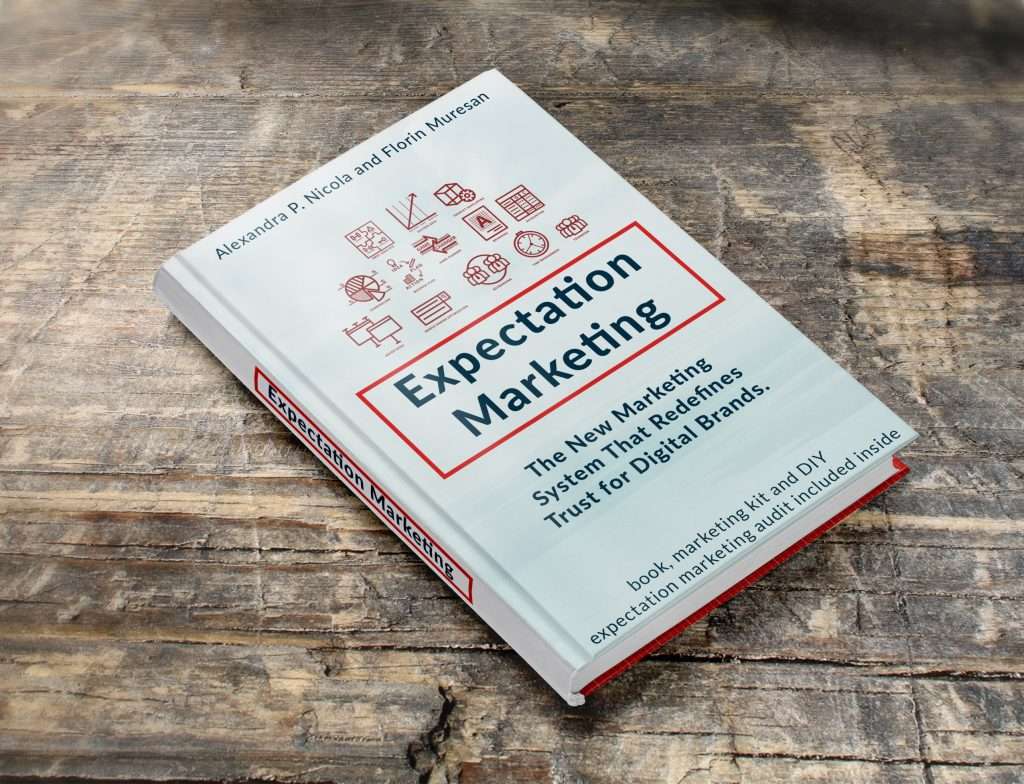
- Use a structured strategy guide. Work through this lesson series and the book Expectation Marketing: The New Marketing System That Redefines Trust for Digital Brands. A guide can help organize your approach, but your team still needs to research, create, review, publish, and distribute the content.
- Get help with delivery. If your team lacks time or skills, consider outside support. Compare who will handle research, approvals, publishing, distribution, and reporting. Agree on scope and responsibilities before you begin.
Now you’ll have to make your choice between the 3 options. For those of you who are interested in applying it yourself, we’re starting the lesson. I’ll give you an in-depth starting point for all the aspects you might need to take care of.
Do It Yourself, But Involve The Whole Team
Consistency means keeping the promises you make about useful updates and communication. Choose the channels and schedule your team can support rather than trying to publish everywhere.
It can be done if you have a clear structure and a team behind you. The first step was to evaluate your site, and you’ve done that (hopefully) in the previous lesson. Now you know what aspects you need focus on.
To make sure I don’t miss anything I will present each point on its own. Feel free to scroll and find the topic you want to focus on.
Brand Information
If you don’t have this on each page of your site, you need to consider where to add it. The easiest way is to include it in one of the elements that appear on each page.
For example, you should have a menu bar that is the same on all pages. You can include your brand, name, and tagline, on the left or above the bar, similar to a Social Media cover.
As far as the Contact information goes the classic place to add it is in the footer of the page. But that’s not the only option you have. The Grable Group site has tried something different that helps their strategy a lot.
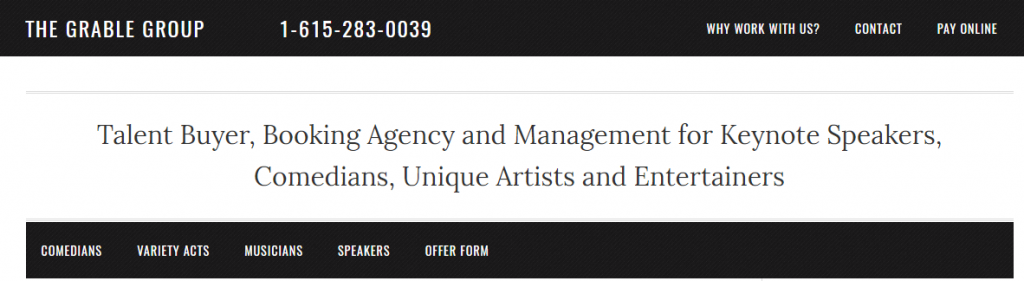
By adding it in the top banner of the page or on the side, you have more chances people will actually see it, which means more visitors will contact you.
Another aspect we stressed upon in the Audit was the short description. In Expectation Marketing it is important for new visitors to understand what your brand is all about.
Make sure the short description, on the Home Page, isn’t too vague or subtle. I’ve seen brands that focus their story on emotions and abstract concepts.
It’s ok to do that in a Tagline or a Motto, but leave the short description as descriptive as possible.
Contact Information
Start by creating a list of all the Communication channels you have. I am thinking of emails, phone numbers, and even social media profiles where you answer quickly to your audience.
Include only contact channels your team monitors. State realistic response times and make the appropriate sales or support route clear.
After you have the full list, consider where you should add them to your site for them to be readily available. The standard answers would start with the page footer and the contact page. But you can also be creative with them.
You can add a particular contact channel where you are presenting it. For example, if you have a Sales Team page, put the Sales contact info there as well.
It’s better to have this information everywhere. Much better than the visitors on your site never finding it.
Written Content
If you don’t already have a blog on your site, make sure to set one up. If you have a WordPress site that’s easy to do.
Just make sure the theme you have on the site looks good for post type pages. Then create at least one blog category that will be shown on your site.
Choose a publishing cadence your team can sustain. A weekly article can be a useful starting plan, but it is not a requirement for every business. A complete, accurate answer matters more than meeting an arbitrary quota.
In our ebook, we offer a clear step by step model and an Editorial Calendar Spread Sheet. Here, I will show you how the structure of the Editorial Calendar we recommend looks like. We’ll also explain the process required to use it to its full potential.
The original lesson described practices developed during Squirrly’s agency work from 2014 to 2017. The core workflow remains useful; the tools and channel choices should reflect your current business.
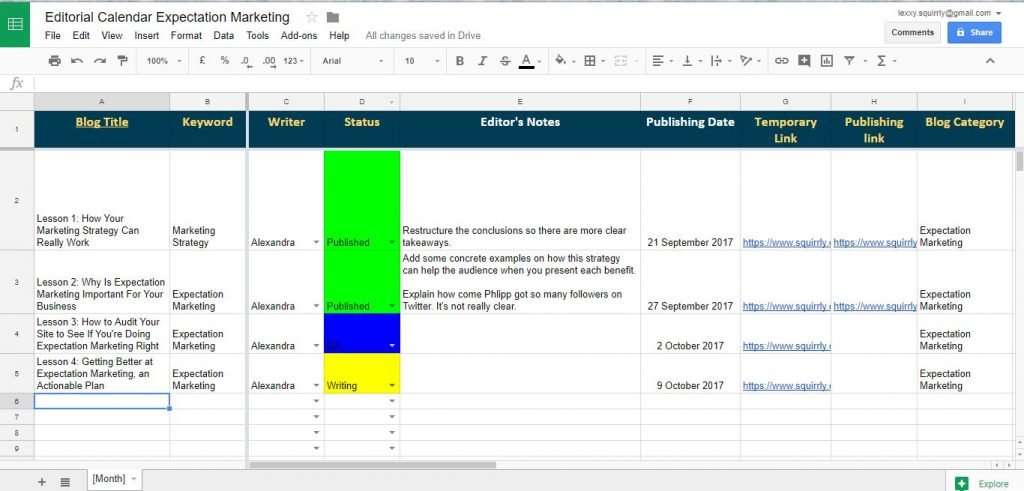
In Expectation Marketing, you need an editorial calendar that has all the information in one place, but that isn’t too cramped with info. That way you can stay on top of your strategy in one single file. The strategy works best if you include one sheet in the Editorial Calendar for each month’s publishing. That way you’ll only have 4-5 articles to look at.
The first columns of the editorial calendar are the “Blog title” and the “Keyword.” To make filling out the editorial easier, we added a drop-down menu for the “Writer” and “Status” columns. The stages of the content creation process in Expectation Marketing are:
- Chosen topic (or chosen pitch)
- Research
- Writing
- QA (Quality Assurance)
- Proofreading
- Done
- Scheduled
- Published
The method we recommend is for each member of your team to come up with 25 possible topics for articles on your site. Gather them all in one place. Then the person who is responsible for the strategy should choose the best items.
Add all of the selected topics in your editorial calendar and change the status to “Chosen topic“. This is the moment when you should add the “Publishing dates” for each article.
The date will help your team have a timeline for creating the posts. We recommend you start one month in advance. That means that at the beginning of this month, you’ll choose the topics for all of next month’s slots. (open dates when you’d like to publish)
When someone in your team wants to start creating an article, they will select their name in the “Writer” column. They will also change the status to “Research“. In order for each article to be useful to your audience, you’ll have to do some preliminary research before starting to write the article.
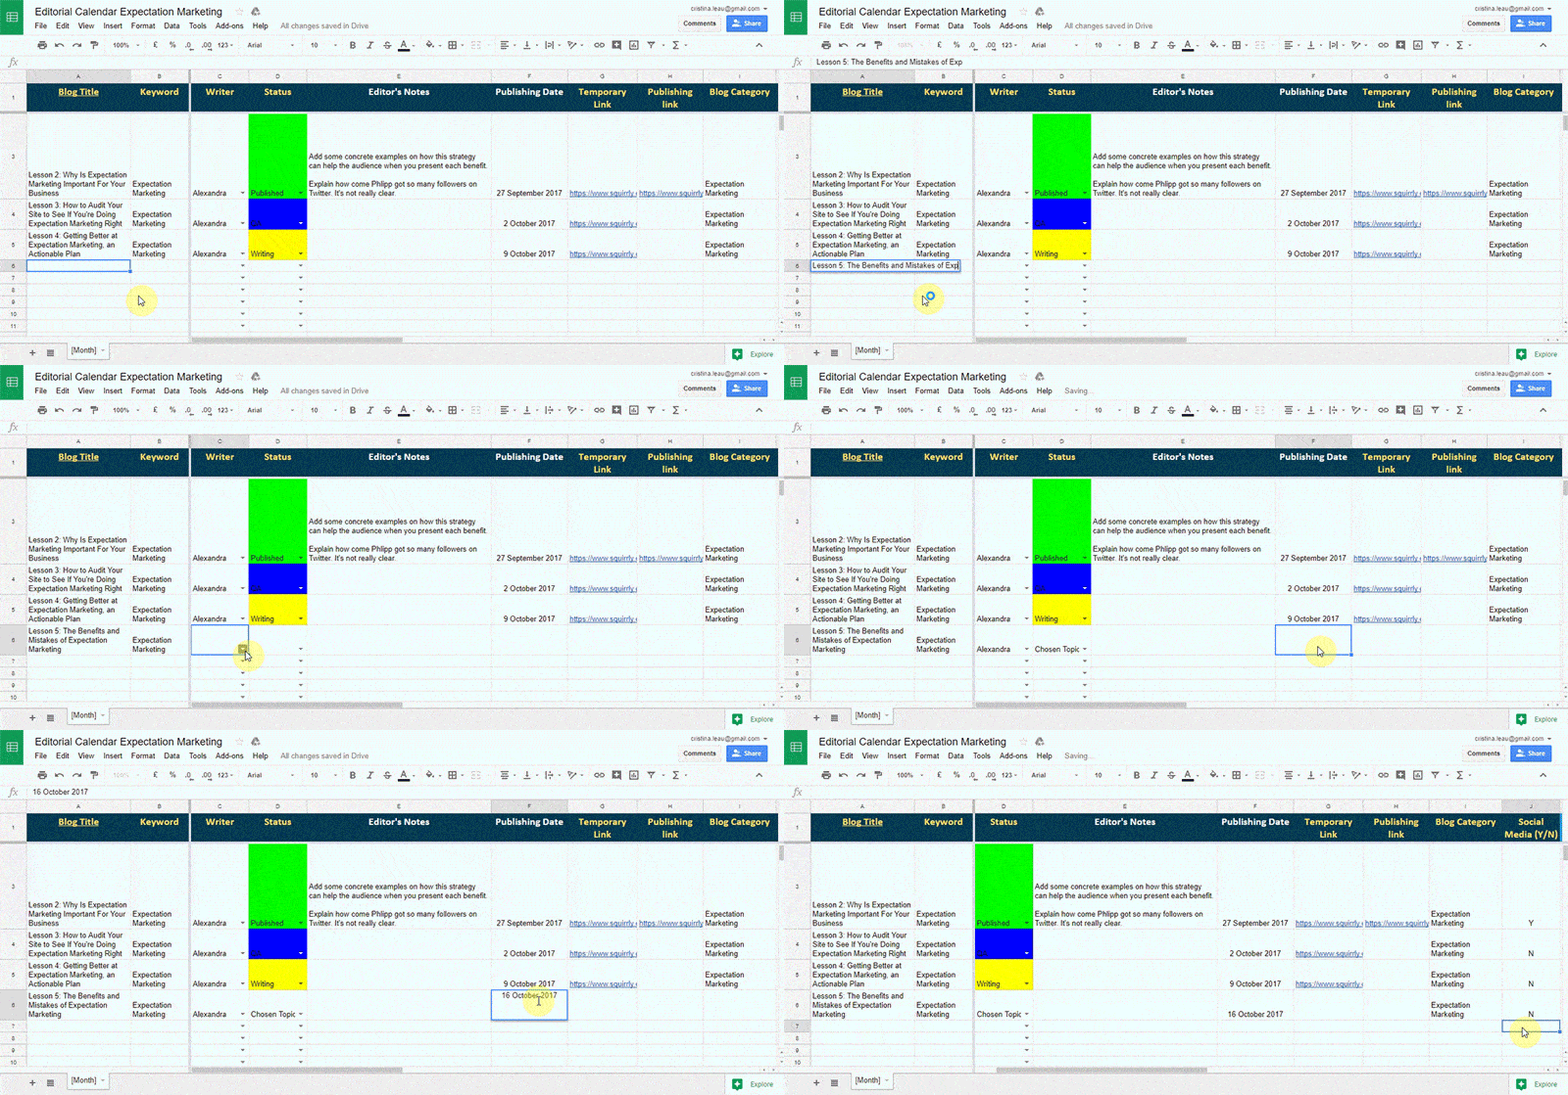
Then the author will start writing the article. They will do it in the back-end of your site and a draft link for the article will be created. This will be copied in the “Temporary link” column and the status of the article will be changed to “Writing“.
After the article has been written, the author will change the status to “QA.” That means your editor can start the Quality Assurance process. They will write all notes regarding changes to the article in the “Editor’s Notes” column.
If there are changes to be made, the post’s status will be switched back to “Writing“, and the Author will implement the changes. Once the article is ready, it will move to the next stage, meaning”Proofreading“.
The Proofreader in your team will read and make necessary changes to the article. Once it is done, the article will move in the “Done” stage.
Build a small buffer of reviewed articles where practical. You can begin with one strong piece; the important part is having a realistic plan for the next ones.
Once they’re live, it’s important to change the status to “Published” so the social media expert in your team has all the information in one place.
This process is the one that we’ve been using for our agency’s clients for years. It proved to be the most efficient way to work to deliver good content to our customers as fast as they needed it.
The “Publishing Link” column will have the link to the article once it is published, and the “Blog Category” helps us know in which category we should include the article. Helpful if our clients have multiple blog categories on their site.
Use distribution columns for the actual channels you maintain, such as LinkedIn, Facebook, Instagram, YouTube, or X. Record each post’s owner, format, scheduled date, and live link rather than relying on a single Yes/No field.
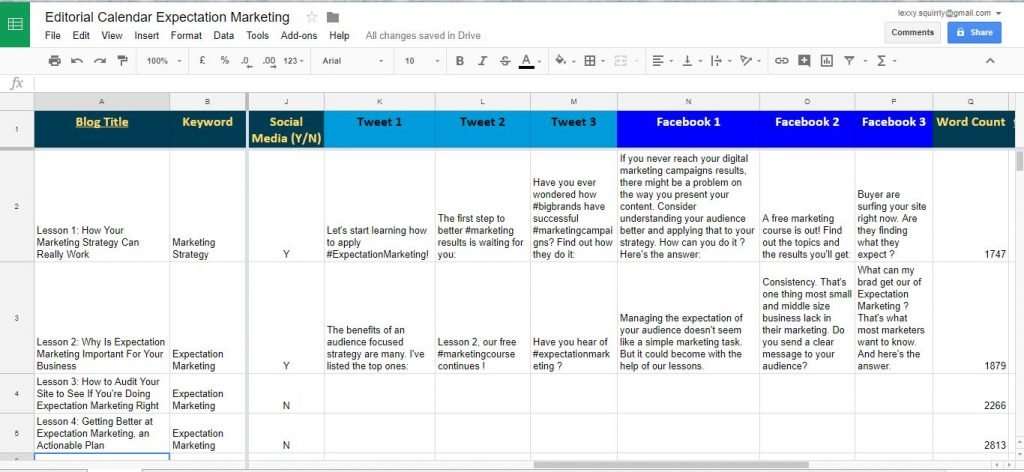
The last column is the “Word Count” of each article. There are also a few extra columns in the editorial if there is any particular information you might need in your strategy.
In our case, we added links to two platforms that help us create better titles for our articles. After we finish the posts, we come up with different options of titles for the article, and it’s great to have the links at hand here in the editorial calendar.
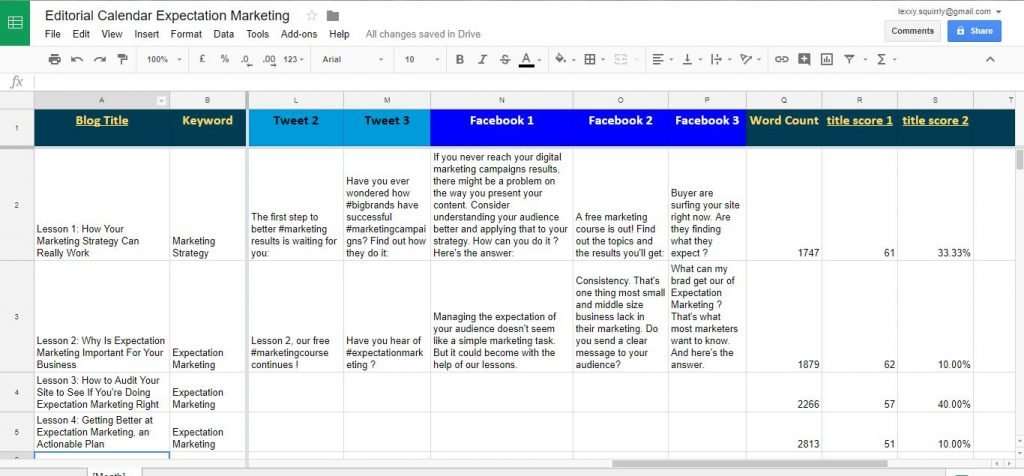
When it comes to landing page information, you can keep a similar structure. Create a new sheet in and change the “Publishing Date” column to “Update“. That way you’ll know when the last update to the copy on those pages, has been done.
Social Media
To have a great presence on Social Media from the perspective of Expectation Marketing, you first have to create a list with all the profiles your brand already has. If there are any other Social Media platforms, you’d like to include in your strategy write those down as well.
Once you have the list, consider how many Social Media Channels you can commit to.
Which channels can your team maintain with useful updates and timely replies? Make that commitment explicit before adding new profiles.
Now that you’ve narrowed the lists, you have to do three things:
- Review accounts you cannot maintain. Keep their business details accurate and direct visitors to an active channel. Archive them where appropriate; do not automatically delete useful history or give up a valuable brand handle.
- Create the new accounts you’ll need.
- Update your brand image with a consistent and evergreen design. I’m suggesting you create a profile picture and cover images that look similar. They should work with the brand and can be used throughout the year not just for a particular campaign (eg. a Halloween campaign).
Once you’ve finished the initial step, add clear links to the active profiles you want visitors to follow. Use your website’s built-in social icons or a maintained integration. AddThis is no longer an option: Oracle ended its services on May 31, 2023.
Plan social content weekly and schedule it with an appropriate tool, such as Squirrly Social. Choose a cadence you can maintain and review results by platform. The original quotas of daily posts everywhere and five posts per day on X (formerly Twitter) are not universal best practices.
Curate outside content when it adds useful evidence or a perspective your audience needs. Add your own explanation and credit the source. There is no required 50–75% curation ratio; judge the mix by usefulness, qualified engagement, and business outcomes.
After you do that, check your profiles at least once a day. See if you have any reactions to your posts. Make sure to answer any comments and give likes and retweets.
Mobile Devices
For most new sites and redesigns, start with responsive design. If you already operate separate mobile URLs, evaluate the migration with your developer rather than changing URLs casually.
Now if you notice your site can’t be accessed or just looks bad from mobile devices you have a choice to make. Go for:
- Use a responsive layout with the same core content across devices.
- Test representative pages and complete real customer tasks on a phone.
For a new site or redesign, responsive design is usually the practical starting point. Google recommends responsive web design because it is easier to implement and maintain. Existing separate mobile URLs need careful technical maintenance and equivalent core content.
Responsive layouts adapt the same page to different screen sizes. Test the actual experience: navigation, readable text, image sizing, tap targets, forms, checkout, and loading behavior. A responsive theme alone does not establish that every page works well.
After you implemented the best option for your brand, recheck your site from a mobile device. If you are using different software to create your landing pages, check each page to make sure they are optimized for mobile.
Email Lists
If you don’t have an email list already, setting one up is not that hard to do. Get a subscription to an email list managing system. Some of the options you could consider are Mail Chimp or Mailer Lite.
Add a clear sign-up form with a useful reason to subscribe and a realistic description of what you will send. Make it easy to decline or unsubscribe. Do not let an intrusive pop-up obstruct the page, particularly on mobile.
Next, you should focus on creating the initial series of emails your audience will receive. If they are new to your email list, you should always send them a sequence tailored to them. If your brand is a company focused on products, send them content that will help them use those products better.
If you’re promoting your service, offer them content about the process they will go through. If you’re a personal brand, I recommend you send them the most popular evergreen articles on your site to make sure they will read all of them.
But you’ll also have to send them content even after this first drip. And this aspect is connected to the Editorial Calendar we’ve discussed when talking about written content.
One option you have is to send them a weekly newsletter with the latest articles from your blog. This is the simple way to have a constant reminder of your brand in their inbox.
A more personal approach would be a weekly editorial with updates from your brand.
Conclusions
Now you have an actionable plan for all the aspects you and your team should focus on. Start by organizing your strategy and creating the best content and then focus on maximizing it’s potential.
For a more detailed strategy, you can check our book and all the materials it offers.
Don’t forget to leave a comment with any questions you might have concerning the Plan presented here.
Continue to Lesson 5 for the potential benefits and common implementation mistakes.
Keep email delivery part of the plan
Useful emails still need a reliable delivery setup. Work with your email provider to authenticate the sending domain and provide a clear unsubscribe route. Google’s sender guidelines set different requirements for ordinary and bulk senders to personal Gmail accounts, including stronger authentication and one-click unsubscribe requirements for bulk marketing senders. Review the current requirements when configuring your system.
Continue the Expectation Marketing course
- Lesson 1: How Your Marketing Strategy Can Really Work
- Lesson 2: Why Is Expectation Marketing Important For Your Business
- Lesson 3: How to Audit Your Site to See If You’re Doing Expectation Marketing Right
- Lesson 4: Getting Better at Expectation Marketing, an Actionable Plan
- Lesson 5: The Benefits and Mistakes of Applying Expectation Marketing
- Bonus Lesson: How to Meet Customer Expectations with Amazing Content
Original lesson: Lesson 4: Getting Better at Expectation Marketing, an Actionable Plan.